How to grow your own herbs for cooking
The next time a recipe calls for fresh basil, skip the poor substitute of dried basil, forgo the last-minute dash to the supermarket for some overpriced wilted basil, and just pluck a few tender leaves off of the basil plant you have growing in your very own herb garden. What? You don't have fresh basil growing in your garden? Well consider this your invitation to start.
Growing your own herbs is a simple and inexpensive undertaking that pays off big for your taste buds and your budget. If you can keep a houseplant alive, you can sustain an herb garden. Here’s how.
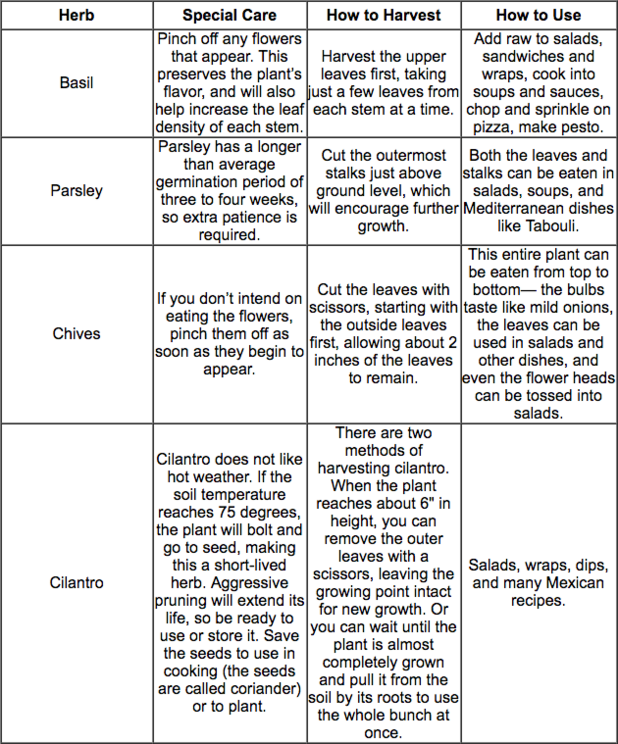
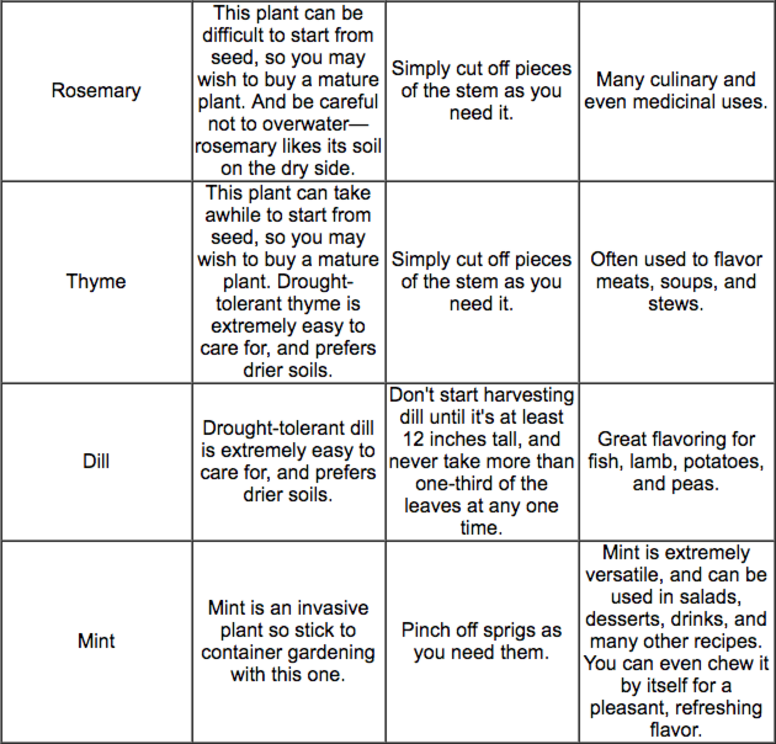
Decide what you want to grow. Some popular choices from home cooks are listed here along with their care instructions. Start with just a few that you know you’ll use regularly, and then branch out from there.
Decide where to plant your herbs. Many herbs grow well indoors and outdoors in the ground or in containers. If you have a little space with at least 5 hours of direct sunlight a day, you may prefer to grow them indoors, as the herbs will be much more accessible for cooking and watering, and not subject to threats of pests, weeds, or variations in temperature.
Decide whether you’ll start from seeds or seedlings. Seedlings are very young plants that you can transplant into your own garden. They are typically only available in the spring and summer from gardening centers and farmers markets. Seeds cost less, but take more time and resources to grow from scratch (here's how).
Gather your materials. You’ll need a few gardening tools, like a small shovel or spade, some gardening gloves and pots or containers (optional since herbs can also be planted directly into the soil). You’ll also need some fertilized soil. If you have a compost pile, you can use some fully decomposed compost to fertilize the soil. Otherwise, you can use a general purpose compost solution, available in any gardening store. If you’re container gardening, use a packaged potting soil mix, which will be free of pests.
Start planting. If you’re starting from seeds, sow into moist soil and cover with 1/2 inch of soil on top. The seeds should germinate in about one week. If you’re using a pot or container for seedlings, follow these steps.
- Ensure proper drainage by filling the pot with a shallow layer of course gravel.
- Fill the pot about 1/2 of the way full, and place the plant, still in its original container, into the new pot. Add dirt around the plant, gently packing it into place, so that the top of the new soil is at the same level as the top of the plant’s original soil.
- Remove the plastic pot, tap it so you can easily slide the plant and all of its soil out, and place the plant and all of its soil into the hole in the soil of the new pot.
Care for your plants. Water at the base of the plant when the soil begins to feel dry, at least once per week. Pull weeds that appear near the plant, because they will steal the nutrients from the soil. If growing outdoors, bring them in before the first frost.
Harvest the herbs. Most plants will grow new leaves if you don’t pick the stems bare. You can pick the leaves with your fingers or snip them with kitchen shears.
Use or store the herbs. Many recipes call for fresh herbs, so simply pick your herbs, wash them and pat them dry before using in your favorite recipes. To store, you can preserve your herbs for future use by freezing them or drying them. In either case, you must first prep them. First, remove any soil or bugs by rinsing in cold water. Then, remove flowering stems and flowers and gently remove excess water by patting with a paper towel. Once your herbs are prepped, you can choose your method of storage:
- Air drying: Cut the stems at soil level and hang upside down in bunches (so that the flavorful oil travels into the leaves) to dry for one to two weeks. Once dry, remove the leaves from the stems and store in a dry, airtight container for up to a year.
- Freezing: The benefit of freezing, as opposed to drying, is that the herbs retain more of their just-picked flavor. Place clean herbs directly into freezer bags, or try the cube method: Place a few teaspoons of chopped, fresh herbs into each cell of an ice cube tray. Fill the trays with water, and freeze. When cooking, just pop out a cube and add it to the pot like you would fresh herbs!